-B- Cloud P2P remote access if you know the password and username of Sannce registered account holding DVR P2P relevant information
For this demonstration and explanation , my DVR is at home and is connected to the internet. My computer is away from home and connected to the internet. There is no connection through any cable or local wireless network or any other network that allows any sort of direct or indirect connection between my computer and the DVR, ( other than the world wide web internet to which they are both connected)
On the computer is no installed Guarding Vision PC Client Software.
As a result of the various work detailed in the previous posts of this blog, we have a P2P account registered at Sannce. We had used that previously to obtain successful viewing of the cameras connected to the DVR via the Cloud P2P way. At this stage I have done nothing to remove anything from that account.
The account username and password are
cloudp2pee
CloudP2P.!*
I downloaded and made a fresh install of the Guarding Vision Software.
( full details: .exe installation File: https://excelfox.com/forum/showthrea...ll=1#post15901 ;
Installation: https://excelfox.com/forum/showthrea...ll=1#post15902
First use : https://excelfox.com/forum/showthrea...ll=1#post15901 )
After the successful installation a Guarding Vision desktop icon appeared on my computer’s desktop.
I double click on the Guarding Vision desktop icon , and as expected, I am asked on the first opening to give a “Super User” username and a password. This password is only required for further running/ opening of the Guarding Vision, and can be anything, but for the sake of simplicity I will use the same as in all previous working examples
DocAElstein
Gaudy.!*
After logging in , ( and cancelling any offered help window) , I am left with the basic Guarding Vision PC Client Software user interface.
By default, Device Management is showing a single simple ( local ) Device, - that showing with background highlighted in brown https://i.postimg.cc/0NH658DZ/Device-for-managemant.jpg
https://i.postimg.cc/qv94b9Gz/LTE-Ser-Sszu-D-1-snip.jpg
https://i.postimg.cc/cLKdcswp/LTE-Ser-Sszu-D-1.jpg
| _#_Control Panel______Device Management_ |
_Device Type______________
|
_ _#_Upgrade Server _____
|
__+_Add New Device Type ___
|
On opening this ( local LAN Type ) # Device is typically the only default + Added device. The software and technology behind this is for simple local connection. This device is no use to us, because our DVR is not connected locally – it’s not connected to the same router or modem to which our computer is: I am away from home at a remote location, which might be anywhere in the world. My DVR is still at home, and is connected to my home router/modem via a LAN RJ45 Ethernet cable.
We need a type that has the ability to do the P2P remote stuff, since we need this P2P technology to get access to our DVR across the internet ( https://www.encyclopedia.com/economi...technology-p2p )
Note also that no online device is showing: The Online Device window is designed to search for ,and show, any locally connected devices such as DVRs which we can then use via a simple local connection
So we need to add a new device type: https://i.postimg.cc/L4yydWyT/Add-New-Device.jpg
We need and so check the Cloud P2P Device , https://i.postimg.cc/PJq2pbqY/Add-New-Device.jpg
After doing this the new Device type appears available to us in Device type window, https://i.postimg.cc/jdmZ27Yn/new-de...ype-window.jpg , but it is not selected – ( so we are still managing the simple device type , and so the large window remains empty , https://i.postimg.cc/4yKpRWdL/Still-...-have-none.jpg )
So we select the newly added Cloud P2P Device type, https://i.postimg.cc/6q1zd77S/select...evice-type.jpg .
The act of selecting / clicking the Cloud P2P Device button in the device type window is to evoke a large Sannce cloud login window, and the first thing we must do is select the land associated with our DVR, - in my case Germany , https://i.postimg.cc/MKv9zYN8/Select...fore-login.jpg , then login , https://i.postimg.cc/GpkMZhN8/login-...ct-country.jpg .
Hitting login evokes the Sannce Login / Register window, https://i.postimg.cc/Zqk77yfz/Sannce...ter-window.jpg . We are only interested in the upper login half, https://i.postimg.cc/HshPMNXx/only-i...ter-window.jpg , since we are wanting to use our already registered Sannce account, cloudp2pee
cloudp2pee
Cloud2P2.!*
We add that password and username details of our already registered account, and login , https://i.postimg.cc/7Y6Wf4Cd/Add-de...-and-login.jpg
We should then see some Processing … going on, https://i.postimg.cc/x8R87HGx/Some-p...ng-is-done.jpg , which may take a few seconds since it is attempting to access information held by Sannce. If this “Importing” is successful then we will see our device appearing in the large window which is now managing Cloud P2P devices https://i.postimg.cc/jjrcQY5s/Succes...cloudp2pee.jpg
We are finished now, and we should be able to access our DVR via the Main View window,
https://i.postimg.cc/NMBNYvqN/main-v...cloudp2pee.jpg
main view after Succesful Import of cloudp2pee.JPG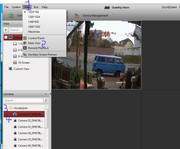
https://i.postimg.cc/nh9SG1G1/1-came...cloudp2pee.jpg https://i.postimg.cc/rmjfwZqq/1-came...cloudp2pee.jpg https://i.postimg.cc/9X1km0fy/1-came...cloudp2pee.jpg
1 camera view after Succesful Import of cloudp2pee.jpg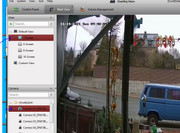


 Reply With Quote
Bookmarks