


(Logout and) Login with Sannce P2P account to importAt the point where we are in this worked example, we are logged in with a Sannce P2P account with user name cloudp2pee which holds information for, and has authorisation to, access our DVR remotely over the internet.
In Main View we see this:
https://i.postimg.cc/QCyJmWD3/Main-V...ore-logout.jpg
Main View before logout.JPG
, and in Device Management we see this.
https://i.postimg.cc/fyLvYf6C/Device...ore-logout.jpg
Now we logout, https://i.postimg.cc/xCgRk4Fq/Logout...Management.jpg
Because we have the Cloud P2P Device selected, we are returned to the large Sannce P2P cloud login window
https://i.postimg.cc/XJnLYbLT/Logout...e-selected.jpg , so then we re login https://i.postimg.cc/136LjDzM/Re-login.jpg . Typically the last username used would be remembered and written in already, https://i.postimg.cc/sDbkmT3v/Re-log...count-used.jpg . Note that we are only interested in logging in, - the registration no longer concerns us, so we ignore the Register button, https://i.postimg.cc/NFzWW4TC/Re-log...logging-in.jpg
We enter the password, and hit login, https://i.postimg.cc/KcpSkZV7/Enter-...hen-Log-in.jpg
Some processing appears to be happening, https://i.postimg.cc/Yq4cQ5K5/Some-p...ng-is-done.jpg , and then note that typically , if all has gone well, a small black window pops up for a second to inform that “Importing succeeded” https://i.postimg.cc/kG401ZVt/Import...ack-window.jpg
Now, in Device Management we see the same as we did just before logging out.
https://i.postimg.cc/vBs1R7Mz/Device...r-re-login.jpg
But the first thing we notice new in Main View is that we now have a + appearing to the left of the folder corresponding to the P2P account name , cloudp2pee https://i.postimg.cc/N0TyPChF/appear...-P-account.jpg
If we then
either
_ hit the restart/refresh symbol, https://i.postimg.cc/MTmnzcp8/Hit-cy...-P-account.jpg
or
_ click on that + ,to reveal the camera “resources” in a drop down list, and then double click on the first camera listed, https://i.postimg.cc/kgL6s3pL/Hit-th...-P-account.jpg
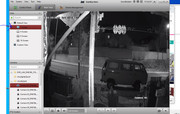
, then we now see the picture.
( In this worked example, I just have one camera connected, and so it is best to select the single screen, 1-Screen view , since no attempt is then made to cycle through different cameras, and this proves in the practice to give a more stable picture )
https://i.postimg.cc/jdwJ7S8y/1-Screen-View.jpg
1-Screen View.jpg
( Currently we still have our computer connected to the same router/ modem as the DVR, but that is just because of how I have organised and developed all of the explanations so far. I could now disconnect the computer from my router/modem, and go to any remote location, and then, as long as I connect my computer to the internet , ( anywhere in the world ), I should still see the same picture, because I am accessing the DVR over the internet. )
So finally we have finished the main purpose of this Blog.
We progressed by firstly obtaining a working local LAN access to the DVR. But that was not necessary. So in the next posts, we explain how to obtain a working remote P2P access of the DVR , starting at a remote location , with a fresh installation of the Guarding Vision Software. We will not concern ourselves with a working local LAN access to the DVR.


 Reply With Quote
Bookmarks