


Make Entry for Standard local Device - + Add an actual type to the standard type management presented to us by default
So , as explained in the last post, on opening Guarding Vision software for the first time, a device type had been added automatically. We could call this a local or standard device.
A Standard device could be any directly / locally connected device, so can include our PC LAN Access
One way to make this entry is to use the +Add button of the large window in which things are written in / Added
https://i.postimg.cc/sxXB3wbK/Add-Button.jpg https://i.postimg.cc/tTDZ0LvY/Add-a-...ice-Button.jpg
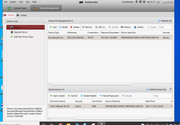
That is a fully acceptable way to Add a particular device, but as we have an Online Device showing in the Online Device window below , ( which is the one we want to Add ) , we can take advantage of the button by the Online Device window to add that device. This way has the advantage of adding in some of the details for us: The basic entry dialogue boy that comes up is identical to that which comes up with the standard Add button of the large window , but on opening after using the +Add to Client button, some of the entries will be already written for us: https://i.postimg.cc/XvfBLZwK/Add-a-...ent-Button.jpg – Specifically the local address in our LAN network of our DVR , 192.168.2.100
We need to write in two entries, the User name and Password pair, which we discussed as the first user name and password pair that we met , which we named “ userame and password pair by first time DVR with Monitor, and needed in later LAN use on a computer “
admin
Sannce.!*
( We also need to add a “Nickname” of our choice. This will be used as a name on any button to select this device. It can be any name we chose. I personally prefer to use something to help remind me what it is referring to, something like
DVR_LAN _ DN81BL _F53992124
So we fill in the three bars and hit the Add button in the Add dialogue box, https://i.postimg.cc/vZ6V12TN/Add-a-...ent-Button.jpg
https://i.postimg.cc/3wYFHdJv/Fill-i...en-LAN-add.jpg
Since we are accessing a local directly connected device, this connection/Adding process , ( typically referred to as Importing ) will usually be very quick.
A small black window bottom right to confirm the success will typically pop up just for a very short time , https://i.postimg.cc/q7VC2cCM/Importing-Succeeded.jpg , and this ,along with the details appearing in the main window including the Net Status** symbol indicating a working connection, https://i.postimg.cc/GhfDmnLD/Net-Status-Good.jpg , will mean that almost certainly we can view our cameras now on our computer. This viewing is always done in a similar way for any added devices, but note that after the first viewing there is a small change to allow quicker viewing on any subsequent viewing. More detail on this viewing in the next post.
Summary: Our first ( device management ) action
So, at this stage, we opened the Guarding Vision PC Client Software for the first time, which by default had added a device type, ( a simple local device type) , and we had an online device showing, ( - our DVR was showing because we had connected it via a LAN cable to the same modem/router as our computer).
Because our DVR was showing as an online device, this simplified the adding of a particular simple local device, our DVR, which we did in this post.
We are not viewing anything yet on our computer, as we have just done some managing of the DVR. ( The next post takes the simple steps to now actually do our first viewing with a computer )
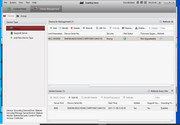
https://i.postimg.cc/g2vH5vdp/Finish...LAN-device.jpg https://i.postimg.cc/BQtDWR94/Finish...LAN-device.jpg
Finished first use of Device Management added the online LAN device.jpgFinished first use of Device Management added the online LAN device.jpg
( Note in those last screenshots we have scrolled to the right in the second ( right ) screenshot to get all information )
( **Note , incidentally, that the Net Status is referring to the online status of the computer, and is not an indication of the status of the LAN cable connection to the DVR . ( Should the computer go off line, the Net Status will change thus: https://i.postimg.cc/637LBrgr/Net-St...er-Offline.jpg ) )

 Reply With Quote
Bookmarks