Page 3 https://excelfox.com/forum/showthread.php/2769-P2P-Cloud-DVR-remote-Access-via-a-(remote)-PC-Using-Guarding-Vision-PC-Client-Software?p=15910&viewfull=1#post15910 https://excelfox.com/forum/showthread.php/2769-P2P-Cloud-DVR-remote-Access-via-a-(remote)-PC-Using-Guarding-Vision-PC-Client-Software?p=15910&viewfull=1#post15910
https://excelfox.com/forum/showthrea...ll=1#post15910 https://excelfox.com/forum/showthread.php/2769-P2P-Cloud-DVR-remote-Access-via-a-(remote)-PC-Using-Guarding-Vision-PC-Client-Software?p=15910&viewfull=1#post15910
Step 2b: P2P Access
2b) Remote ( Cloud P2P ) Access of DVR over the internet with a PC using Guarding Vision Windows PC Client Software
Step 2b: P2P Access
Remote ( Cloud P2P ) Access of DVR over the internet with a PC using Guarding Vision Windows PC Client Software
Most published instructions for Remote ( Cloud P2P ) Access of the Sannce DVR over the internet with a PC using Guarding Vision Windows PC Client Software are incomplete or incorrect. ( Example the section from Step 2b: P2P Access at the following Sannce article is wrong and incomplete, https://support.sannce.com/hc/en-us/...arding-Vision-
Similarly the Sannce article here , https://help.annke.com/hc/en-us/articles/4405215514905 , is incorrect
2b) Remote ( Cloud P2P ) Access of DVR over the internet with a PC using Guarding Vision Windows PC Client Software,
2b) -A- ______ Following on from previously obtaining LAN local access, and
Adding ( making available ) DVR for remote Cloud use for the first time: DVR is not yet Registered for P2P remote Access
https://excelfox.com/forum/showthrea...ll=1#post15912
2b) -B- Cloud P2P remote access if you know the password and username of Sannce registered account holding DVR P2P relevant information
https://excelfox.com/forum/showthrea...ll=1#post15918
2b) -C- Cloud P2P remote access if no Sannce registered account holds DVR information
Possible Problem! Need to remove details of DVR from Sannce registered devices
https://excelfox.com/forum/showthrea...ll=1#post15919


 Reply With Quote
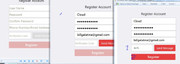


 ….
….

Bookmarks